Monday 26 December 2016

55 Days at Big Tinkle on Sea - A VSF Scenario

Well time for a Christmas FUBAR VSF game, I've got a mate maybe two coming over Thursday so we're on ...

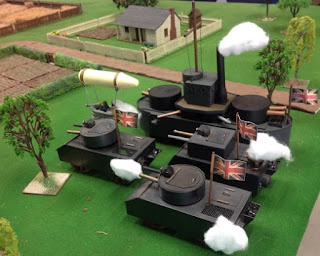
The Armoured Steam Traction Engine and Battle Wagon Mk I Combination loaded with Christmas supplies for the children of Big Tinkle in on Sea photographed just prior to the Christmas Eve relief attempt of the besieged Port...

55 Days at Big Tinkle in on Sea
Christmas Eve 1878

The Situation

In Late 1878 The First Great Steam War continued to drag on with no apparent end in sight and the great Western Democracies continued their battle against the Tyrannical Empires of the east. For the oppressed British citizenry of occupied territories the future looked gloomy. Alondside these people were the besieged and embattled residents of Big Tinkle in on Sea who continued to defy the invaders for Queen and Country! Their sleepy yet vitally important Port had been besieged by Russian and Prussian troops who were intent on relieving the populace of their freedom and using the docks to reinforce their invasion armies.

For over 50 days the siege continued and then on the 51st day with Christmas but days away a large Prussian artillery shell landed directly on and destroyed the hapless inhabitant’s only toy shop! It was the thin edge of the wedge, the starving children were facing a Christmas not only without pudding but also with no presents! This devastating news reached the ears of Her Most Gracious Majesty Queen Victoria who immediately ordered the Port relieved and toys to be delivered for the children! Volunteers from the Guards Landship Squadron stepped forward and organised a daring raid to penetrate the Evil Empires besieging forces from behind. This was their chance to tweak the noses of the Tsar and Kaiser while engaging iun the christmas spirit by delivering toys to the besieged children!

December 24 1878 on day 55 of the siege of Big Tinkle in on Sea the British relief force sallied forth just after morning tea. It broke through the enemy’s entrenchments with ease! While local British Militia and men of the 1st Naval Brigade tied down the Russian and Prussian infantry the steam powered units of the relief column made their dash for the Port. With Brigadier Gout aboard the Lnadship HMLS Clueless the armoured assemblage powered ahead at a majestic 8 miles an hour! At this rate Gout thought to himself they would be in the town square for a spot of lunch with the Mayor! Oh yes and in time to give the rug rats their Christmas gifts…

Meanwhile the besieging Commander General Guddenoff surprised by the British raid amassed all his available Steam Powered Armoured Wagons and launched them into action against the relief column as soon as their fireboxes were alight! The vehicles commanders, Colonel Fullovshtzhy and Major Von Bung-Fritz were given orders that not only were the toys aboard the British column to be denied to the local children but they were to be captured intact and sent back to their homelands for their own young folk! A race was on between the patriotic officers to secure the cargo first for their own Country’s youth!

The cast has been assembled and the stage set…”Action!” shouts the Director!

Forces
British
Enter Turn 1 from the East edge of bthe attlefield - automatic successful activation
Brigadier Gout OBE KBE BIG GIT
Detachment  from the Guards Landship Squadron
1 x HMLS Clueless (Dreadnaught Class Landship)
1st Flight 266 Blimp Squadron led byCptain Drling)
3 x Steam Blimps
3rd Company Royal Engineers
1 x Armoured Steam Traction Engine and Battle Wagon Mk I Combination

Russians
Enter Turn 2 from the westly half of the Northern edge of the battlefield - failed activation delays entry by a turn no Breakdown
Coonel Fullovshtzhy
2nd Detachment St Petersburg Independent Steam Battalion
4 X Steam Powered Armoured Wagons

Prussians
Enter Turn 2 from the westly half of the Southern edge of the battlefield - failed activation delays entry by a turn no Breakdown
Major Von Bung-Fritz
2nd Detachment St Petersburg Independent Steam Battalion
4 X Steam Powered Armoured Wagons

Game Length
12 turns

Reinforcements
Both Prussian and Russians have a final reserve of one additional unit each that can be deployed at all players mutual agreement or on the Umpire’s discretion

Victory Conditions
The British must exit the Armoured Steam Traction Engine & Battle Wagon Mk I Combination from the east board edge in 12 turns
The Prussian must be first to secure the Battle Wagon Mk I before the end of turn 12
Any other result is a Draw

Special Rules
Securing the Battle Wagon Mk I – it must be stationary i.e. the Armoured Steam Traction Engine must be destroyed or immobilised and a vehicle must park alongside it in one turn and then spend a full turn stationary adjacent NOT under fire from any ground based weapons
The Russians and Prussians can’t fire on the Armoured Steam Traction Engine until the Landship HMLS Clueless is destroyed
The Armoured Steam Traction Engine for this scenario only has extra armour:
            1st Speed Hit reduces speed to half
            2nd Speed Hit Immobilises
            1st Steering Hit is recorded has no effect
            2nd Steering Hit Locks Steering
If stationary for a turn the Battle Wagon Mk  may fire its mortar, it CAN'T reload it
The Steam Blimps have one bomb each, it attacks with 6FP and hits on a 3+
The Steam Blimps HMG penetrate armour on a natural 6 up to full range, they have amour piercing bullets!
Captain Darling’s bomb hits with his bomb on a 2+
Captain Darling’s is immmune to breakdowns, he is after all a Hero!
There are no AA weapons in this game
There is a bonus secret British rule, that player alone will be informed of just prior to play!

Next time an AAR!

Monday 5 December 2016

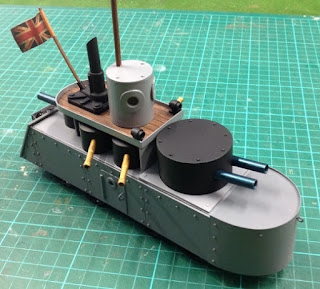
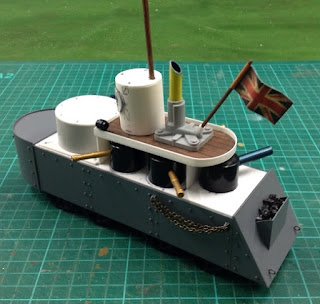
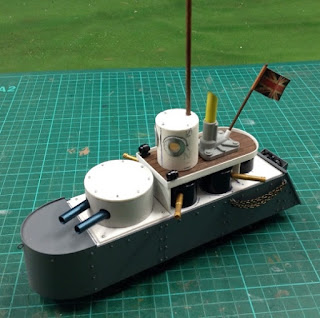
HMLS Swiftsure - First 'Modular' Landship Super Structure Complete

Anyone remember the two generic Landship hulls I built earlier this? I vaguely do...well at the time I collected all the parts for the four interchangeable super structures I planned and then promptly got busy with other stuff. So now I'm fired up again to get back into this project thanks to the recent Denmark Crossing scenario and game. I've decided to complete these super structures so I can get all of my he Landships on the gaming table in 2017!

First off the HMLS Swiftsure, the British answer to the Americans all big gun Landship, I'll do a post with a write up the vehicle's specifications soon!

The finished model of the HMLS Swiftsure...


A picture of one of the generic hulls with the parts of the Swiftsure super structure...
it's the usual collection of styrene sheet and PVC pipe assemblies with pins for rivets. The secondary turrets are the caps off the shampoo bottles you get in hotel rooms and the funnel base is a left over suspension part from my Dragon 1/6 Panzer II kit with a plastic tube extension. The main guns are barrels from a 1/35 Nebelwerfer a mate discarded and the secondary guns are Perry ACW gun barrels thanks to Midshipman easy!
Note - if you have any spare 1/56 Perry ACW gun barrels from their ACW artillery set let me know!

The parts test fitted to the generic hull to check it all looks okay...


Painted up superstructure ready for fitting...

Next time; more Landship stuff!

Friday 2 December 2016

Scenery - Building A Statue or Two

Hi All, I need a couple of statues for the FUBAR VSF PULP scenario I'm working on, I had a look in the Dollar Stores and online and decided to make my own, here a couple of typical Victorian English Gentlemen Explorers with the result...


These are easy to make and I had my two ready to go in less than half an hour, here's what I used...
  • A suitable 'statuelike' figure, I think it's a 28mm Elf I trimmed it here and there
  • Some PVC pipe
  • Some thick plastic sheet
  • Black and Grey spray paint


Glue all this together give it an undercoat of Matt Black from a rattle can then mist over that with Grey and you're sorted...


Next Time...I'll negotiate a peace in the Middle East...well not really...

Wednesday 30 November 2016

VSF Landships Clash - Battle of Denmark Crossing FUBAR AAR

This is the first game I have played where I pit Landship against Landship with my FUBAR VSF Lanship rules in effect! I've tested the rules for Landships in games where there is one is involved and they seem to work fine so given we needed a game in a hurry for our regular group catch up I hurriedly put this together.

The Forces

Americans
Battle Squadron from the 1st Steam Legion
1 x USLS Lexington
1 x Amoured Steam Wagon Mk VI
4 x Triambulator all armed with a Light Cannon
1 x Steam Blimp

British
Elements of the 1st Landship Squadron and the Queens Own Dragoons 
1 x HMLS Hood
2 x Armoured Steam Wagons Mk I
1 x Armoured Steam Wagon Mk III
1 x Steam Blimp

Game Length
8 Turns (options for up to 10 turns)
Turn 9 occurs on a roll on a D6 of 3+ after the completion of Turn 8
Turn 10 occurs on a roll on a D6 of 4+ after the completion of Turn 9

Victory Conditions
At the end of the game tally the number of destroyed, wrecked and abandoned (crew dead) guns each side has 'suffered' and the side with the smaller total 'lost' wins, a tie is a draw.

Special Rules
* There are no AA eligible weapons available to either side
* Each Steam Blimp has 1 Bomb that attack with 6FP
* All vehicles are automatically 'activated ' for Turn 1
* Include special Rules for Lexington Class Landship i.e. weaker side armour allowance

The Situation...

During the Second Great Steam War the two great democracies of the world, Great Britain and the United States of America fell out over the arrogant British Navy's suspect inspections of American merchant vessels utilising European Ports and more importantly their practise of press ganging members of American ship crews!


The American President, Arthur at the advice of the War Office declared war on Great Britain after the British Parliament willfully disregarded the USA's entreaties regarding the Royal Navy's vile and unlawful practises. Within days of the commencement of hostilities small groups of Americans troops invaded Canada but it was several weeks before the first great assaults were launched in early June 1882. By this time though the British Government had dispatched several well trained and experienced units to support their Colony, forces that would have been much better employed fighting the tyrannical Crowned Heads of Eastern Europe and thwart their greedy land grabs! 


July 4 1882 to the north east of the small township of Denmark Crossing, Ontario Commodore Folly aboard his Flagship the HMLS Hood led elements of the 1st Landship Squadron and the Queens Own Dragoons against a strong force of American vehicles from 1st Steam Legion under the command of one of their hero's of the American Civil War ,Lieutenant Commander Hanley...


Let the carnage begin!


The AAR


Turn 1 and both the British and Americans barreled onto the battlefield at top speed. The Americans entered in a solid phalanx and the British in two groups, one Armoured Steam Wagon peeled off from the main force to attempt to flank the American's Landship. 

Turn 2 Saw the Landships fire long range salvos and the USLS Lexington scored hits on one of the British Steam Wagons damaging its steering while the HMLS Hood put one of the Yankee Triambulators out of action, first blood to the Brits Huzzah!

View of the battlefield at the end of Turn 2 the British in the foreground...

Turn 3 and the both sides continued to close the range so the vehicles with lighter cannons could get into action, during this time the British were at a disadvantage with only two heavy guns bearing on the enemy while due to the design of their Landship the Americans had four heavy guns available!

Two views of the battlefield at the end of Turns 3 & 4 the British again in the foreground...


Turn 4 and the HMLS Hood swung to bring its full broadside into action and it loosed a salvo. The trained crew were spot on target registering 13 hits on the USLS Lexington which manged only 6 saves the 7 hits wrought terrible damage, 2 crew killed, a heavy gun was knocked out, 2 steering hits were scored, a speed hit was registered and a wreck hit recorded! A note here that on a Landship 3 of any of these type of special hits are needed for the full effect of the hit type to kick in i.e. 3 wrecks are required to kill a Landship any other type of vehicle and one does the trick! The other British vehicles fired ineffectively while their Steam Blimp manoeuvred closer the the Lexington now shrouded in smoke. This turn much to the Americans dismay both their Landship and Steam Blimp scored stall breakdowns while all their other vehicles moved into cover to avoid fire from the HMLS Hood!

HMLS Hood fires a salvo, the Lexington is in the distance!

Turn 5 and the Yankees gain the initiative but due to the stall the USLS Lexington fails its activation roll! luckily though the men on board the HMLS Hood are busy toiling to reload their heavy guns so the Lexington may still get a first shot in next turn. To add the the American woes their steam Blimp remained inactive too! Meanwhile the British Amoured Steam Wagons targeted the Lexington and it acquired more damage but nothing significant. With the last activation of the turn the American Amoured Steam Wagon entered the action and took a pot shot at the Hood with it's light cannons, seconds later everyone was stunned...the Hood was required to take two damage rolls the first disabled one if it's rapid fire light cannons but the second though was a critical hit...from a distance onlookers saw on the deck of the Hood a flicker of orange and then that was followed instantly by a giant ball of red flames as the HMLS Hood had suffered a critical hit and was totally destroyed! The game balance had changed in a moment. To add to the British troubles one of their Steam Wagons was too near the blast and suffered damage too resulting its steering being locked.

The wreck of the HMLS Hood!

The American forces at the end of turn 5 the vanquisher of the HMLS Hood is in the foreground on the right!

Turn 6 and the USLS Lexington fires on two of the remaining British Armoured Steam Wagons inflicting minor damage on each while their Steam Blimp attempted to catch the flanking British vehicle with no luck. The British Steam Wagons scored a couple more hits on the Lexington knocking out another gun on it and injuring more crewmen they also hit a Triambulator which bursts into flames!
View of the battlefield at the end of Turn 6 the Americans are to the left...

Turn 7 and the British Steam Blimp lined up and took a run at bombing the Lexington, the Pilot smiled as his bomb hit the Landship but his expression turned to a frown as it bounced along the deck and rolled onto the ground with no effect! The last real British hope of getting 'back into' the game had passed. Meanwhile the Triambulator that caught fire from a hit in turn 6 was engulfed in flames and put out of action! The Lexington hit the flanking British Steam Wagon and it ground to a halt its remaining crewmen were killed and the American Steam Blimp with its quarry destroyed moved after a new target!

The USLS Lexington fires in 'anger'!

The British Steam Blimp 'bombs' the Landship Lexington with no effect...

Turn 8, the last two British Armoured Steam Wagons despite only having two functioning light cannons between them continued to engage the USLS Lexington hoping for a lucky hit but none was forthcoming! In desperation the British Steam Blimp even strafed the mighty Landship with its HMG also to no avail!

View of the battlefield at the end of the game the Americans are to the left...

So Victory to the New World as the Americans win 'destroying' 14 weapons to the lowly British total of 4! 

A big lesson was learnt in this game...
NEVER NAME YOUR LANDSHIP AFTER A VESSEL THAT WAS BLOWN UP IN REAL LIFE!

Okay the Landship rules simulated a battleship action on land quite well for me; the USLS Lexington ended the game with several dead crewmen, 1 Wreck hit, 2 Speed hits, 2 Steering hits and two guns knocked out so it took quite a bit of punishment but was still hanging in there, whereas the Hood on the other hand took only two hits (from light cannons to boot) and it was obliterated by a critical hit...PERFECT. So the rules worked well with two Landships on the table, I have enough of these to get five on the table at once so I'll have to work out a 'Jutland' scenario! First up though this scenario needs a replay hopefully without the devastating explosion of the HMLS Hood it may be a bit closer!

Next Time hopefully the AAR for Scenario 5 of 'The Russians are Coming' Campaign!

Sunday 13 November 2016

Campaign Game 5 Set Up Details & Special Rules

Here are the set up details and special rules for the fifth of the The Russians Are Coming campaign scenarios. This game won't require more than a single play test I hope as its a situation I've used several times before. A map of the play area is included. Please feel free to try this scenario with your rules (I am using an adaption of State of War) and if you do please let me know how you went!

The Forces:

Russians four units:

Siberians including NCOs fire and melee as Trained
Fleet Sailors fire and melee as Raw, their NCO fires and melees as Trained
Staff Officer fires as Veteran and melee as Trained

1 Army Staff Officer (Captain Putin)
Army Section 1 NCO (Sergeant Fyodor Keller) 8 Privates
Army Section 1 NCO (Sergeant Andrey Korf) 7 Privates
Army Section 1 NCO (Sergeant Sergi Kamensky) 6 Privates
Army Section 1 NCO (Sergeant Nikolay Krasnov) 8 Sailors

South Australians four units:

Uniformed Privates fire as Trained and; melees as Raw
Plain Clothes Privates fire and melee as Raw
Officer and NCOs fire as Veteran and; melee as Trained

Unley Company Section 1 Officer (Lieutenant Alan Murray) and 7 Privates
Unley Company Section 2 NCO (Sergeant Norman Wakefield) and 7 Privates
Norwood Company Section 1 Officer (Lieutenant Peter Torrens) and 7 Privates
Norwood Company Section 2 NCO (Sergeant Reginald Finke) and 7 Privates

Deployment:

South Australians: All units must enter Turn 1 along the eastern board edge

Russians: All units must enter Turn 1 along the western board edge

Game Length:

The game ends after 8 turns then victory conditions are checked unless a sides units are all broken before this

Victory Conditions:

At the game end count up the number of figures each side has within 25cm of the 'marked centre' of Bill's Hill the side with most wins, if it's a draw the side with fewer wounded figures wins, if that's a draw extend the distance by 10cm and repeat the count keep doing this to you get a result. On the extreme circumstance this still results in a draw still roll a die (reroll ties) until someone wins!

Special Rules:

* The Russians have played their 'Staff Officer' option in this game morale effect for this are in play
* Figures on the hill may spend an action to go prone and when prone they increase their protection from fire by one level but melee against a standing figure at -2, it takes one action to get back up again
The Bill's blocks line of sight and give those uphill on them a melee advantage, it costs no extra movement to climb as the slopes are gentle
The rough ground areas cost double movement when actually traversing them and offer no cover
The dense scrub areas cost triple movement when actually traversing them and offer no protection
The map below of the battlefield deployment compiled from dispatches regarding the battle issued by Lieutenant-Colonel Francis Downes staff including a Legend:


 Next time the Hills Are For Heroes AAR...

Wednesday 26 October 2016

Campaign Game 5 - Hills Are For Heroes

This is the background to the fifth of the seven scenarios of the 'Russians Are Coming' campaign I'm playing through following a hypothetical Russian Invasion of the Colony of South Australia. This is a meeting engagement as both the South Australian and Russian forces attempt to occupy a piece of high ground to the west of the City of Adelaide, it's day ten of the invasion...

A picture of Staff Officer Putin posing with one of the invasion force's Gorloff guns manned by naval personal. Note these "Gorlov" Guns are actually British made Gatling Guns with Broadwell Drum magazines and ammunition bought through arms dealers in Hong Kong while the Russian army was preparing for the invasion at Vladivostok.


Much of the terrain between the Russian beachhead centred on Henley Beach and the City of Adelaide was relatively flat and underdeveloped lowlands. This meant that any piece of high ground without regard of its actual elevation was invaluable to both sides.

With Port Adelaide secured and Russian fleets remaining warships, the ironclad Petr Velikiy and two monitors Admiral Spiridov and Admiral Chichagov now past the block ships and safely within the confines of the harbour Lieutenant-General Lazarev began rolling out his plan to envelope the City of Adelaide and wear down the defenders. Beginning Monday August 25th his army launch strong company strength sorties to the north and south of the City of Adelaide. These raids targeted farms, rail lines and telegraph poles and their cables with the intention of drawing the defenders out of their cover so they could be engaged in open ground and defeated piecemeal. Lieutenant-Colonel Dawes however do not take the bait and held his troops back preserving them while the Russian's exertions were wasted.

During the nightly Russian Command Conference Laverez let all know he intended to change tactics and start to drive the South Australian defensive perimeter in with assaults this way their militiamen would be force to engage his regulars and they would be defeated in detail. To help facilitate this he decided that all the high ground that was unoccupied and overlooked of the South Australians was to be captured forthwith. He reasoned such positions would be invaluable to cover the advance of his troops on the South Australian defensive line surrounding Adelaide as they could act as observation posts for his ships forward observers or be ideal positions to locate his fearsome Gorloff guns.

One such small elevation that drew the attention of the Russians as it had a controlling view of Lieutenant-Colonel Downes South Road defensive line was Bill’s Hill. It was in fact not a hill at all but merely a low rise, still it was noticeably higher that all the surrounding terrain. The 'mound' was man made with the dross from the nearby fields and the South Road excavations. It was known as Bill’s Hill simply because it was located on William Copley’s farm, William was popularly known as Bill! The summit of Bill's Hill though not very high with gently slopes running down from its apex in every direction so it would be an easy location to occupy as it was undefended.

A detachment of regulars led by Staff Captain Ivan Putin from the combined East Siberian Rifle battalion was assigned this task of occupying Bill's Hill. It is interesting to note that even in this relatively early stage of the campaign to make up for shortfalls in troop numbers sailors from the fleet vessels were being incorporated into units to flesh them out so Captain Putin's command included a section of such troops. Jump off time for his men to launch their attack was Wednesday August 27th at noon!

At the same time as Lazarev decided to send troops to capture all the high ground surrounding Adelaide's defences including Bill’s Hill Lieutenant-Colonel Downes had coincidentally decided that this elevation was of importance to his defence of the City of Adelaide. Orders were drafted for it to be occupied, fortified and artillery to be emplaced post haste!

Wednesday dawned hot and as the sun reached its apex the heat of the day increased. The thirsty and sun burned soldiers of the East Siberian detatchment may not face any defenders but they still needed to move forward under the eyes on a well-armed enemy force which they expected would attempt to interdict their advance in every means at their disposal. They did not expect they would become engulfed in a tense engagement with the South Australians which was exactly what was about to occur. As Putin the Russian commander signaled his men to advance with a shrill tweet from his whistle the South Australians from the blooded Unley Rifle Company that had been skirmishing with the Russian for over a week now and supported by the fresh and eager men of the Norwood Rifle Company, noted for their flamboyance and élan began their advance on Bill's Hill too. The time the South Australians planned to move out and establish their defences on the mound was noon as well!

Next Time the Scenario Set Up Details for Hills Are For Hero's!

Monday 17 October 2016

Stanley's Redoubt AAR

Siberian Infantry attacking the stoic Colonial defenders of Stanley's Redoubt...

This fourth Campaign Game Scenario for my The Russians Are Coming series was played a year ago so the AAR has been a long time in the coming! This scenario had four replays with the South Australians winning three to the Russians one. The first two saw the South Australians win comfortably and the second two where the Russian OOB was upped from four units to five saw a victory to each side. I listed the larger Russian force in the set up post as it seemed to make the game better balanced. Anyway this win for the South Australian defenders puts the Campaign Game running total at three wins to the Colonials and one to the Russian Invaders. So the Ruskies have some work to do in the next three games.

For this game the Russians elected to go with the Staff Officer campaign option to boost their morale and also because the chance of their Commander in Chief Lazerev suffering a heart attack grows as the campaign goes on and once that occurs this bonus is no longer available to them. So the Russian units all gained a big advantage on their morale rolls and even when several had dwindled to half strength they soldiered valiantly on when lesser men would have turned tail and fled! As with all the games so far played in the campaign the initiative rolls are crucial and being last player in a turn and first one in the next gives your forces four actions in a row and that can be decisive, I like this as it creates some variability in the game, players will never makes the mistakes often made by leaders in the field due to FOW etc...oops I had better get off the soap box and back on track. I have selected game two of the four for the AAR as even though the Russians were a bit short on resources in this one they came very close to a win! I believe the best Russians tactic is to swing a section to each flank and rush the centre with the rest of their men. The game in which they won they used skirmish formations to close on the palisade then when close formed line and attacked, the risk of losing a full phase redeploying was offset by the extra movement each turn they were in skirmish order, while a section deployed to each flank. Charging in a column down the road to close quickly and then redeploying could be another valid tactic but not one used so far maybe a fifth game may see that. Every game we played had a melee at the palisade as the Russians with the Staff Officer morale boost were able to press home attacks despite losses and the effect of the hard cover for the defenders negated with the Russians having a trained melee level versus the Colonials Raw melee ability. A successful charge and break through was always on the cards here. 

Well here's how the selected 'historical' game ran... 

The History:

Sunday August 24th was a hot day and the soldiers of the Adelaide Rifle Company were awoken by a thunderous barrage of artillery fire which to their relief it was directed not at them but far to the north around Port Adelaide. The men Sergeant Bruce's section had slept in position behind their fortifications overnight and had tea and breakfast brought up to them from the Rifle Company's bivouac. They enjoyed their repast and took up their places at the palisade in the blazing sun. They discussed what could be occurring at the Port from where the sound of battle emanated and were relieved no 'Ruskies' appeared to be interested in them. Two Privates, Rawlinson and Benjamin even played eye spy as they wiled away the time. The men became restless as the day passed and the time of their relief approached, they all anxious to get back to camp and the shade.

Little did they know not far away to their north west Captain Pushkin had been made aware of their location by one of his trusty Cossack scouts and he was in process of preparing to launch an attack on them. Three of his section leaders proposed a wide flanking manoeuvre to take the South Australians in the rear but with no mounted cavalry to scout out a secure path Pushkin resorted to a frontal assault with the Cossacks making a small flanking sortie on the right. He had confidence he could better these militiamen and extolled as much to his section commanders. The advanced was to be in open order to minimise casualties and they would close ranks at the last moment to charge. 

It was just after 10:30am that Private Rawlinson said to Private Benjamin "I spy....Russians...". Benjamin said "That's not how you play the game..." He cut his sentence short as his gaze caught sight of Russian soldiers in the distance. Sergeant Bruce was momentarily taken aback by the men's comments but quickly spied what they had seen and ordered the troops to stand to order which they promptly did...seconds later he roared..."Men now’s our time to be counted...pick your targets and fire at will!" The crack of Martini Henri fire started forthwith. 

Sergeant Nikolai Arkharov led the Siberians on the right of the skirmish line. The distant rifle fire did not concern him it resembled nothing more than fire crackers going off as the enemy redoubt loomed bigger in his eyes with every step taken. Suddenly he lurched...he had been grazed...curse the devil he thought as he reeled. He was only 'out of action' momentarily but once he recovered and looked around everyone was well ahead of him he scurried to catch up. Captain Pushkin seeing Arkharov hit moved over and took command of his section personally while cajoling everyone as the continued forward. 

Bruce's command cheered again and again as Russians fell from their fire but concern mounted as the enemy remorselessly approached them despite the casualties they had taken. After Private Jones yelled there were Cossacks to their right and both Rawlinson and Teagle also shouted their ammunition was spent Bruce could hear fear in the voices of the South Australians. The Sergeant knew his men were wavering he could do little but act as an example, he fired like an automaton and ordered those without bullets to fix bayonets while urging the rest of the section to maintain their fire. 

It was at this second the momentum of battle shifted, the Russian advance paused momentarily as their leaders tried to communicate to their men above the din of battle and simultaneously to their rear the South Australians heard the shouts of their fellow Riflemen coming to their assistance. Bruce enthused by these events yelled "Pour it into them lads we can't have the rest of the Company come up and steal our glory!" The lads cheered their fear evaporated in the heat of the moment and they stood firm continuing to fire at their foes without respite. 

At the same time Sergeants Bashilov and Dutov were at a loss, the fire from the palisade continued unabated and their men were shaken by the attempt to form lines, to remain in place or to try an continue their formation change would lose their forward momentum. They took the initiative and decided to close on their enemy in skirmish order, the order to charge the enemy was given. Pushkin seeing his centre and left sections charge without forming line could do little but order his men to follow suit. In what seemed to be an instant everyone was gathered at the Colonials palisade and engaging in the deadly work of hand to hand fighting... 

The South Australians were shocked that any of the Russians could have survived the inferno of fire they had cast at them and when they emerged from the smoke and were suddenly face to face they instinctively defended themselves. The sound of battle now engulfed everyone and it was a case of every man for himself, Jones fell dead, a Russian NCO was suddenly on the Australian side of the palisade and Sergeant Bruce put paid to him using his rifle as a club, Private Teagle fell...then suddenly Russians were to the flanks of the South Australians, they were working their way around the palisade! Bruce continued to inspire his men to hold the Russians back. Captain Pushkin saw his men climbing over and dashing around the redoubt and he roared encouragement to his troops urging them on again and again while firing his revolver and waving his sword frantically. From his view the battle was as good as won! 

Sergeant Abbott brought his section up behind Bruce's and formed a line, he watched in horror as the melee continued between the Russians and Bruce's men but held his unit back for fear they may be engulfed too. He steadied them and kept them at the ready, if the Russians broke through they would act. 

Almost as an aside to battle raging around Stanley's Redoubt there was a separate action taking place at a small rise covered with dense scrub and dominated by a single pine tree to the left of the palisade. Captain Scullin believed this rise was where a group of Russian Cossacks were headed so he commanded his men, "We must stop those Cossacks boys, head for the Lone Pine we'll make our stand there!” and so it was Scullin’s men met the Cossacks at 'Lone Pine' and after a brief melee and a few casualties on each side Cossacks retired. 

Meanwhile back at "Stanley's Redoubt" the battle reached its climax, Pushkin's men were close to victory and he believed it was within his grasp. Then Bruce's command broke and routed the three survivors bolted and Private Rawlinson was taken prisoner...the Russians cheered and flushed with success moved forward and were met with a volley of fire from Abbott's fresh men...the Russians tried a final lunge forward urged on by their surviving leaders but they'd shot their bolt...with more than half their number dead or wounded they faltered and fell back. Pushkin knew his men were done and he ordered them to retire which they did in good order taking their prisoner with them. 

Sergeant Abbott's section immediately occupied the palisade where they found themselves standing in a sea of blood with bodies from both sides strewn everywhere they had won the day but many a good men would never see another...

The AAR:

The Russians moved all their regulars forward toward the redoubt for a frontal attack in skirmish formation planning to form line when close enough for the final assault. A unit of Cossack launched themselves forward in a flank attack on their right. For three turns the Russians advanced and the South Australians fired for all they were worth. Despite a large number of weapons jamming and two Martini's breaking down/users running out of ammo they scored a several kills, wounds and grazes. Unfortunately for the Colonials the Russian Staff Officer morale bonus meant every check they made was easily passed. The Russian forces at the end of turn three:


Turn four and the Russians reached their attack positions opposite the redoubt. While the Colonials at the palisade fired two phases of effective volleys at the Russian regulars their reinforcements arrived one section to reinforce the palisade and the other deployed to cover the Cossacks:

Turn five and the South Australians bagged the initiative so after having the last 2 phases of turn four to hammer the Russians in front of them they now had another two phases...insert Russian groans here...again the Russian took casualties and now instead of wasting any time to reorganise and suffer further Colonial fire they charged the palisade hoping their superior melee value would prevail despite not being formed up:

Turns five and six saw a desperate melee break out around the palisade:

"Crikey Sarge they're all around us!" Cry of an unknown South Australian militiaman:


A short yet vicious melee broke out at a place known to the South Australian's as Lone Pine, casualties were light on both sides but importantly the Cossacks were defeated quickly in the words of Captain Scullin, "We sent them off In short order!"


In turn six the casualties finally exceeded everyone's level of acceptance, Sergeant Bruce's section fled leaving one encircled man behind to surrender and the start of turn seven saw two of the three Russian army sections and the Cossacks finally succumbed to morale checks:


The Russians at this point realised the jig was up. They came within a cat’s whisker of success but were just a handful of men short of success. They withdrew along the front and began to retire. The South Australians with one section completely routed and unable to rally and both the others with casualties were happy to see the Russian retire albeit in good order:


The newspaper caption to the below photograph was, "Take that yer hairy Cossacks!"

Positions of the troops at the end of the game after the Russian part of turn seven:

One last point comment adding to my above summary of the game, the 'Colony at War' rules being used have generous morale tests allowing units to stay in action longer than one would normally expect, I could adjust this but in keeping with the bravado of the Victorian Era 'regular fighting men' and 'militia chaps of standing' are expected to fight to (practically) the last man...plus it makes for better fun gaming...

Next up Scenario Five, this one puts everyone under pressure in a 'meeting engagement'. Everyone will be trying to secure a salient terrain position to gain victory with the bonus that gaining victory in Scenario Five sees your forces in comfortable defensive position for Scenario Six so the win is crucial!